List
Healthix list is designed to take quick look at data preview, navigate between them and respond to them as quickly as possible.
The user interacts with the collection of items via touch events or the toolbar. Individual items can be selected. This selection may update the toolbar or may trigger a detailed screen based on the selection.
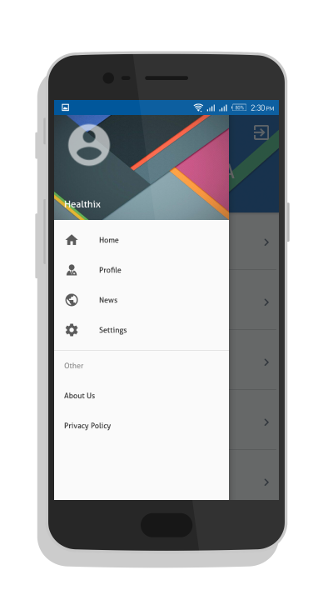
Navigation List
You can navigate between alert list filters by clicking on menu icon on top left.
    private void setUpNavigationView() {
        //Setting Navigation View Item Selected Listener to handle the item click of the navigation menu
        navigationView.setNavigationItemSelectedListener(new NavigationView.OnNavigationItemSelectedListener() {

            // This method will trigger on item Click of navigation menu
            @Override
            public boolean onNavigationItemSelected(MenuItem menuItem) {

                //Check to see which item was being clicked and perform appropriate action
                switch (menuItem.getItemId()) {
                    //Replacing the main content with ContentFragment Which is our Inbox View;
                    case R.id.nav_home:

                        break;
                    case R.id.nav_profile:

                        break;
                    case R.id.nav_news:
                        Intent intentNews = new Intent(getApplicationContext(), NewsActivity.class);
                        startActivity(intentNews);

                        break;
                    case R.id.nav_settings:
                        Intent intentSettings = new Intent(getApplicationContext(), MyPreferencesActivity.class);
                        startActivity(intentSettings);

                        break;
                    case R.id.nav_about_us:
                        Intent intentAbout = new Intent(getApplicationContext(), AboutActivity.class);
                        startActivity(intentAbout);

                        break;
                    case R.id.nav_privacy_policy:

                        break;
                }

                //Checking if the item is in checked state or not, if not make it in checked state
                if (menuItem.isChecked()) {
                    menuItem.setChecked(false);
                } else {
                    menuItem.setChecked(true);
                }
                menuItem.setChecked(true);


                return true;
            }
        }
        );}
layout navdraweritem.xml
<?xml version="1.0" encoding="utf-8"?>
<menu xmlns:android="http://schemas.android.com/apk/res/android">

    <group android:checkableBehavior="single">
        <item
            android:checkable="true"
            android:id="@+id/nav_home"
            android:icon="@drawable/ic_home"
            android:title="Home" />
        <item
            android:id="@+id/nav_profile"
            android:icon="@drawable/ic_doctor"
            android:title="Profile" />
        <item
            android:id="@+id/nav_news"
            android:icon="@drawable/ic_public"
            android:title="News" />

        <item
            android:id="@+id/nav_settings"
            android:icon="@drawable/ic_setting"
            android:title="Settings" />
    </group>

    <item android:title="Other">
        <menu>
            <item
                android:id="@+id/nav_about_us"
                android:title="About Us" />
            <item
                android:id="@+id/nav_privacy_policy"
                android:title="Privacy Policy" />
        </menu>
    </item>

</menu>
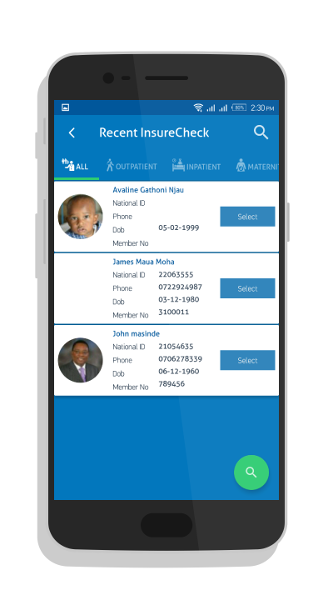
Data List
This is made up of listviews and recyclerviews that contain data presented in a list.This data is mainly loaded from the healthix servers to the app.It is presented in the most basic way showing only necessary details.
RecyclerViewallow to use different layout managers for positioning items.
Recycler view uses aViewHolderto store references to the views for one entry in the recycler view. AViewHolderclass is a static inner class in your adapter which holds references to the relevant views. With these references your code can avoid the time-consumingfindViewById()method to update the widgets with new data.
public class HospitalActivity extends AppCompatActivity {

    private final List<Hospital> hospitalList = new ArrayList<>();
    private List<Payer> listPayer = new ArrayList<>();

    private Hospital hospital;
    private HospitalAdapter adapter;
    private final Gson gson = new Gson();
    Toolbar toolbar;
    private NavigationView navigationView;
    SharedPreferences sp;


    @BindView(R.id.drawer_layout)
    DrawerLayout drawerLayout;
    @BindView(R.id.rv)
    RecyclerView rv;
    @BindView(R.id.text_name)
    TextView textName;
    private Perm internetPermission;
    private static final int PERMISSION_INTERNET_REQUEST = 1;
    AlertDialog alertAuth ;
    SessionManager sessionManager;

    @Override
    protected void onCreate(Bundle savedInstanceState) {
        super.onCreate(savedInstanceState);

        CalligraphyConfig.initDefault(new CalligraphyConfig.Builder()
                .setDefaultFontPath("fonts/aller/Aller_Rg.ttf")
                .setFontAttrId(R.attr.fontPath)
                .build()
        );
        sp = PreferenceManager.getDefaultSharedPreferences(HospitalActivity.this);
        sessionManager =  new SessionManager(HospitalActivity.this);

        setContentView(R.layout.activity_hospital);
        navigationView = (NavigationView) findViewById(R.id.navigation);

        ButterKnife.bind(this);
        toolbar = (Toolbar) findViewById(R.id.toolbar);
        setSupportActionBar(toolbar);
        getSupportActionBar().setDisplayHomeAsUpEnabled(true);
        setupNavigationView();


         internetPermission = new Perm(this, Manifest.permission.INTERNET);
        setupPermissions();
        rv = (RecyclerView)findViewById(R.id.rv);
        rv.setItemAnimator(new DefaultItemAnimator());
        rv.setHasFixedSize(true);
       rv.setLayoutManager(new LinearLayoutManager(this));
        startIntroAnimation(rv,HospitalActivity.this);

      // rv.setLayoutManager(new GridLayoutManager(this, 3));
      //  rv.addItemDecoration(new GridSpacingItemDecoration(2, 10, true,this));
        setupOnClick();

        adapter = new HospitalAdapter(getApplicationContext(),hospitalList);
        rv.setAdapter(adapter);
The layout for the view will be as follows example content_hospital.xml
<?xml version="1.0" encoding="utf-8"?>
<android.support.v4.widget.NestedScrollView xmlns:android="http://schemas.android.com/apk/res/android"
    xmlns:app="http://schemas.android.com/apk/res-auto"
    xmlns:tools="http://schemas.android.com/tools"
    android:layout_width="match_parent"
    android:layout_height="match_parent"
    android:background="@color/colorBackgroundPrimary"
    app:layout_behavior="@string/appbar_scrolling_view_behavior"
    tools:showIn="@layout/activity_hospital">

<LinearLayout
    android:layout_width="match_parent"
    android:layout_height="match_parent"
    android:orientation="vertical">
        <android.support.v7.widget.RecyclerView
            android:id="@+id/rv"
            android:layout_width="match_parent"
            android:layout_height="match_parent"
            android:clipToPadding="false"
            />

</LinearLayout>

</android.support.v4.widget.NestedScrollView>